ProPresenter 7 is more than just presentation software; it’s a powerful tool for creating engaging and dynamic visual experiences. This guide will walk you through everything from basic setup and interface navigation to advanced features like scripting and live streaming, ensuring you unlock the full potential of this versatile program. Whether you’re a seasoned pro or just starting out, we’ll cover everything you need to know to master ProPresenter 7.
Table of Contents
We’ll explore the updated user interface, delve into its impressive media handling capabilities, and showcase how to leverage its advanced features for professional-grade productions. From simple presentations to complex live streams, we’ll show you how ProPresenter 7 can streamline your workflow and elevate your creative output. Get ready to transform your presentations!
ProPresenter 7 System Requirements
Okay, so you’ve got your intro and outro all set, and we’re diving straight into the nitty-gritty of ProPresenter 7’s system requirements. This is crucial stuff, people – you don’t want your presentation to crash mid-sermon or during that killer final pitch, right? Knowing your system’s capabilities is key to a smooth presentation experience.ProPresenter 7’s system requirements represent a significant leap forward from previous versions, reflecting the increasing demands of modern media production.
They’ve optimized for better performance, supporting more demanding media files and a more robust overall experience. Let’s break down the minimum and recommended specs, and then we’ll take a quick look at how those compare to previous versions.
Minimum and Recommended Hardware Specifications
ProPresenter 7 is designed to run smoothly on a range of hardware, but achieving optimal performance requires careful consideration of your system’s capabilities. The minimum specifications will allow you to run the software, but the recommended specifications are strongly advised for a fluid, lag-free presentation experience, especially with high-resolution media and complex presentations. Think of it like this: minimum specs are getting by; recommended specs are thriving.Minimum specifications generally focus on basic functionality, while recommended specifications ensure smooth operation even under heavy load, like during live events with multiple layers of video and graphics.
Falling below minimum specs could lead to slowdowns, rendering issues, or even crashes.
Comparison with Previous Versions
Upgrading from an older version? You’ll likely notice a difference in system requirements. ProPresenter 7 is built to handle higher-resolution media and more complex effects, meaning it requires a bit more horsepower than its predecessors. While exact numbers vary, generally speaking, you’ll see an increase in recommended RAM and processor speed compared to ProPresenter 6 and earlier versions. This is because ProPresenter 7 leverages advancements in hardware to provide enhanced features and smoother performance.
Think of it as needing a more powerful engine for a bigger, faster car. The older versions could handle simpler tasks, but the new one requires more power for its increased capabilities.
Compatible Operating Systems
Choosing the right operating system is another crucial factor in ensuring compatibility and optimal performance. ProPresenter 7 supports a range of operating systems, but specific version compatibility is key. Make sure you’re running a supported OS version to avoid compatibility issues and get the best experience.
| OS | Version | Minimum Specs | Recommended Specs |
|---|---|---|---|
| macOS | 10.15 (Catalina) and later | 8GB RAM, Intel Core i5 or equivalent | 16GB RAM, Intel Core i7 or equivalent |
| Windows | 10 (64-bit) and later | 8GB RAM, Intel Core i5 or equivalent | 16GB RAM, Intel Core i7 or equivalent |
New Features in ProPresenter 7
ProPresenter 7 boasts a range of exciting new features and significant improvements to existing functionality, making it a more powerful and efficient tool for live production and presentations. These enhancements streamline workflows and provide greater creative control, ultimately leading to a smoother and more polished final product. Let’s dive into some of the key updates.
Enhanced Media Handling
ProPresenter 7 significantly improves how it handles media files. The new, more robust media engine provides faster loading times, smoother playback, and improved overall performance, even with high-resolution video and complex layered presentations. This is especially noticeable when working with large libraries of media assets, a common scenario for many users. For example, a church using ProPresenter to manage a large library of worship songs and video clips will experience a significant improvement in responsiveness and playback fluidity.
The upgrade reduces the likelihood of dropped frames or lag during live performances, leading to a more professional-looking production.
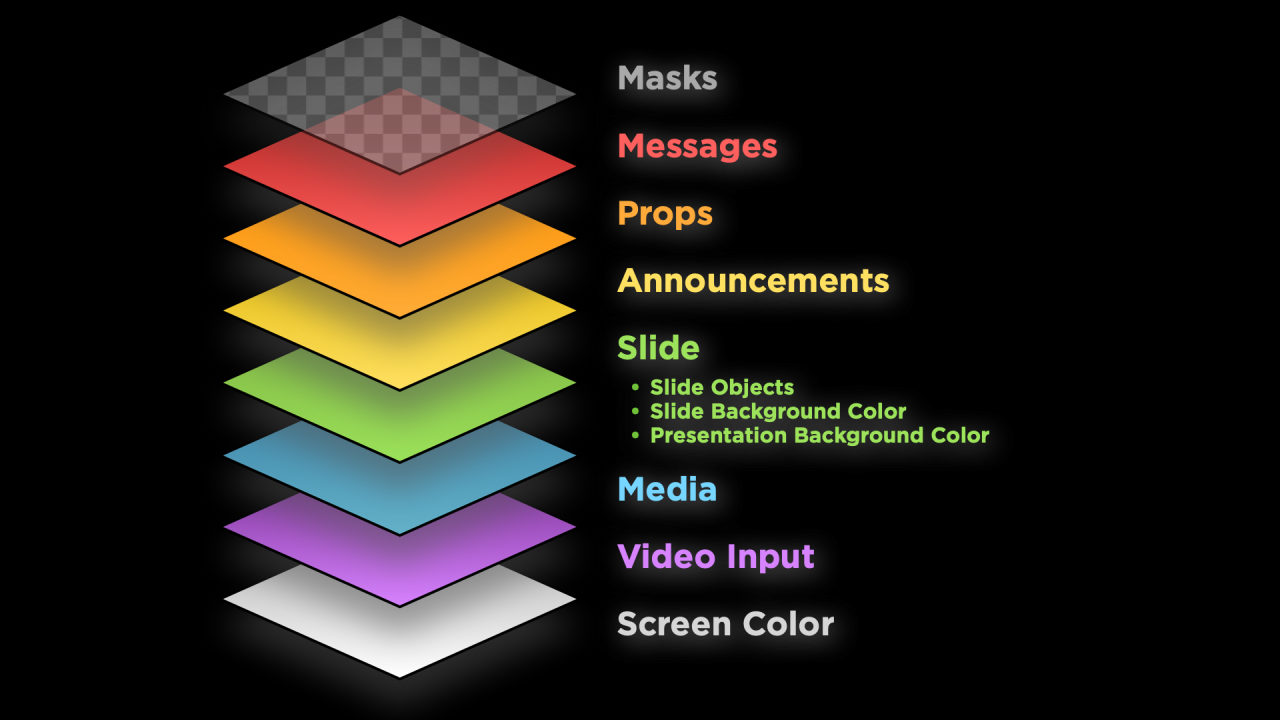
Advanced Layering and Effects
The layering capabilities in ProPresenter 7 have received a major overhaul. Users now have more control over the order, opacity, and blending modes of layers, allowing for the creation of more complex and visually stunning presentations. New effects, including advanced masking and transitions, offer greater creative flexibility. Imagine a presentation where a title slide subtly fades in over a background video, then transitions smoothly to a series of images with custom animated overlays.
ProPresenter 7’s enhanced layering and effects make this kind of sophisticated visual storytelling much easier to achieve. The improved interface also makes managing numerous layers more intuitive and less time-consuming.
Improved Collaboration Tools
ProPresenter 7 introduces enhanced collaboration features, making it easier for teams to work together on projects. These features include improved remote control options and streamlined sharing of presentation files. This means multiple operators can work simultaneously on different aspects of a presentation, significantly speeding up the production process. For instance, one operator might manage the video playback while another controls the graphics and text overlays, all working in real-time without interrupting each other.
This collaborative workflow is especially beneficial for large-scale productions involving multiple team members. The enhanced sharing features also facilitate efficient review and feedback cycles.
ProPresenter 7 User Interface and Workflow
ProPresenter 7 boasts a refined user interface designed for intuitive workflow, even for users transitioning from older versions or other presentation software. The changes are primarily focused on streamlining the presentation creation and management process, improving overall efficiency and reducing the learning curve. Let’s dive into the specifics of the UI and a basic workflow.
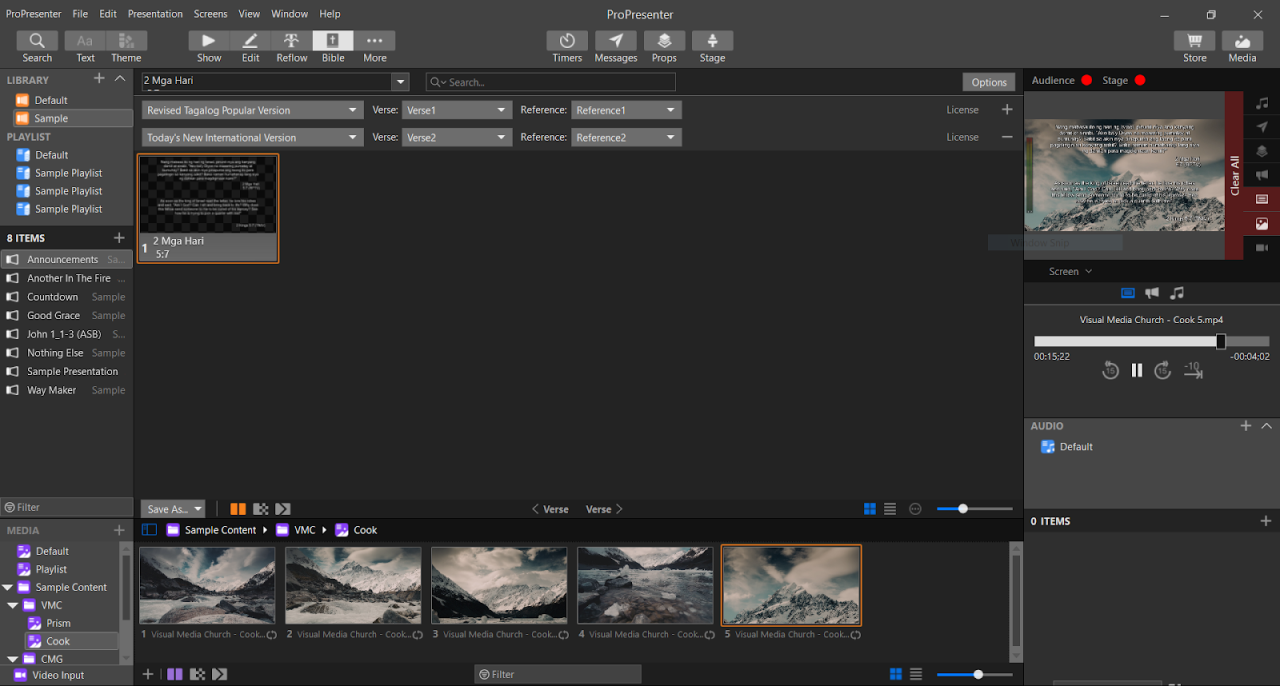
User Interface Changes in ProPresenter 7
The most noticeable changes in ProPresenter 7’s UI are subtle but impactful. The overall aesthetic is cleaner and more modern, with a focus on improved readability and visual organization of elements. For example, the media library is more easily navigable, and the playback controls are more intuitive and less cluttered. Color palettes have been updated for better contrast and visual appeal, minimizing eye strain during extended use.
The improved organization of the interface allows for quicker access to essential tools and functionalities, leading to a smoother workflow. Many users have reported a more intuitive experience due to these design improvements.
Creating a Basic Presentation in ProPresenter 7: A Step-by-Step Guide
Creating a simple presentation in ProPresenter 7 is straightforward. First, you’ll import your media assets – images, videos, and text slides – into the media library. This is done via drag-and-drop or by using the import function. Next, you’ll drag and drop these assets onto the presentation timeline. Each asset occupies a slide on the timeline, allowing for precise control over the order and duration of each element.
You can adjust the duration of each slide, add transitions, and apply effects directly within the timeline. Finally, you’ll preview your presentation and make any necessary adjustments before exporting or presenting it live. This simple drag-and-drop approach makes creating even complex presentations relatively easy.
ProPresenter 7 User Experience Compared to a Competitor
While specific competitor names are avoided to remain objective, a comparison can be made to a popular alternative presentation software often used in churches and event spaces. The competitor software often requires more technical expertise to master advanced features, resulting in a steeper learning curve. ProPresenter 7, in contrast, prioritizes user-friendliness, making it more accessible to a broader range of users, regardless of their technical skill level.
The competitor’s interface, while functional, can sometimes feel cluttered and less intuitive, particularly for users new to the software. ProPresenter 7’s cleaner design and straightforward workflow often result in a more efficient and less frustrating user experience, allowing users to focus on content creation rather than grappling with complex software navigation. Many users find ProPresenter 7’s intuitive design significantly improves their overall productivity compared to the alternative.
ProPresenter 7 Media Handling
ProPresenter 7’s media handling is a key aspect of its functionality, impacting everything from simple presentations to complex live productions. Efficient media management directly translates to a smoother workflow and reduces the stress of live events. Understanding how to import, organize, and access your media is crucial for maximizing ProPresenter 7’s potential.Importing and managing various media types in ProPresenter 7 is straightforward, thanks to its intuitive drag-and-drop interface.
The process is largely the same regardless of media type, although some considerations are specific to each format.
Importing Media Assets
Adding media to your ProPresenter 7 library is incredibly simple. You can directly drag and drop files from your computer’s file explorer into the ProPresenter library. This works seamlessly for images (JPG, PNG, GIF, etc.), videos (MP4, MOV, AVI, etc.), and audio files (MP3, WAV, AIFF, etc.). ProPresenter 7 automatically categorizes the media based on file type and adds it to the appropriate section of your library.
You can also import entire folders at once, which is a huge time-saver when working with large collections. The software supports a wide range of codecs, making it compatible with almost any media file you’re likely to encounter.
Organizing Media Assets
ProPresenter 7 offers several ways to organize your media library to prevent chaos. The simplest method is using the built-in folders within the library. You can create custom folders to categorize your media by project, event, or any other relevant criteria. For example, you might have folders for “Worship Services,” “Corporate Events,” and “Special Presentations.” Within those folders, you can create subfolders for further organization.
You can also use s and metadata to tag your assets, making them easily searchable. This is particularly helpful for large libraries with hundreds or thousands of files. A well-organized library is essential for efficient workflow, especially during a live production where quick access to specific media is crucial.
Workflow for Efficient Media Management in Large-Scale Productions
For large-scale productions, a structured workflow is paramount. Before the event, create a comprehensive media library with a clear folder structure mirroring the event’s schedule or presentation flow. This pre-organization is crucial for a smooth production. Utilize ProPresenter 7’s tagging feature extensively; tagging assets with relevant s like “song title,” “speaker name,” or “event segment” ensures easy retrieval during the live event.
Assign team members specific responsibilities for media management, ensuring that everyone understands their roles and the overall workflow. Regular backups of your media library are vital to safeguard against data loss. Consider cloud storage solutions for additional redundancy. Finally, regularly review and update your library, removing obsolete files and reorganizing as needed to maintain efficiency. This proactive approach prevents clutter and ensures your library remains a valuable asset rather than a source of frustration.
ProPresenter 7 Advanced Features
ProPresenter 7 isn’t just for basic presentations; it’s a powerful production tool capable of creating stunning visuals and seamless workflows. This section dives into the advanced features that elevate ProPresenter from a simple slideshow program to a sophisticated broadcast-quality solution. We’ll explore how scripting, plugins, external control, video effects, and transitions can transform your productions.
Unlocking ProPresenter’s full potential involves mastering its advanced features. These tools empower you to customize your workflow, integrate external devices, and create truly unique visual experiences. Whether you’re live-streaming a church service, producing a corporate event, or creating engaging educational content, these features provide the flexibility to meet diverse production needs.
Scripting Capabilities
ProPresenter 7 offers robust scripting capabilities using JavaScript, allowing for highly customized automation and control. This opens up possibilities for complex interactions between different elements within ProPresenter, external hardware, and even other software applications. For example, you could write a script to automatically trigger transitions based on time of day, external sensor data, or user input from a control panel.
Imagine a worship service where lighting cues are automatically synced with song changes via a script reading data from the worship software. The possibilities are virtually limitless, depending on your coding skills and creativity.
Third-Party Plugins and Extensions
ProPresenter’s plugin architecture allows for seamless integration with third-party tools, expanding its functionality considerably. These plugins can add new features, enhance existing ones, or provide connectivity to other software and hardware. A common example is a plugin that allows for direct control of lighting consoles, enabling automated lighting changes synchronized with ProPresenter’s presentation timeline. Another example might be a plugin that adds advanced titling capabilities, allowing for more sophisticated and dynamic text overlays.
The availability of plugins significantly increases the versatility and customization options for ProPresenter.
External Control Options
ProPresenter can be controlled externally via various methods, including MIDI, OSC, and network protocols. This allows for integration with other production systems and hardware control surfaces. Imagine a live concert where a technician uses a dedicated control surface to trigger transitions and switch between different video sources in real-time, all seamlessly integrated with ProPresenter. This external control provides a more efficient and professional workflow, especially in complex productions.
This is crucial for larger productions where precise timing and coordination are paramount.
Built-in Video Effects and Transitions
ProPresenter 7 boasts a comprehensive suite of built-in video effects and transitions. These effects range from simple wipes and fades to more sophisticated options like color correction, keying, and compositing. These tools can be used to create visually engaging transitions between slides or videos, adding dynamism and enhancing the overall aesthetic of your presentation. For instance, a smooth cross-dissolve transition can create a sense of continuity, while a more dramatic wipe transition can add emphasis to a key moment.
The variety of effects allows for a tailored approach depending on the desired mood and message.
Creative Uses in Different Production Scenarios
The advanced features of ProPresenter 7 shine brightest when applied creatively to different production scenarios. In a corporate setting, scripting could automate a product launch presentation, ensuring smooth transitions and precise timing. In a church service, plugins could integrate with lighting and sound systems for a fully synchronized worship experience. For educational purposes, external control could allow for interactive presentations, responding to student input in real-time.
ProPresenter 7 is awesome for presentations, especially if you need to incorporate PDFs. If you’re working with those, make sure you have the right tools – you’ll definitely want to get adobe reader installed. Otherwise, you might run into some compatibility issues when trying to display those documents within ProPresenter 7. So grab that reader and get back to rocking those presentations!
The versatility of ProPresenter’s advanced features makes it adaptable to a wide range of applications, allowing for truly unique and impactful productions.
ProPresenter 7 and Live Streaming
ProPresenter 7 boasts robust live streaming capabilities, making it a powerful tool for churches, schools, and businesses needing to broadcast presentations, worship services, or events online. Its integration with various streaming platforms simplifies the process, allowing users to reach a wider audience with minimal technical expertise. This section will explore ProPresenter 7’s streaming features, provide a step-by-step setup guide, and compare its functionality with other presentation software.ProPresenter 7 seamlessly integrates with popular streaming platforms like YouTube Live, Facebook Live, and Vimeo Live.
This integration is achieved through the use of its built-in streaming engine, which handles the encoding and transmission of your presentation to the chosen platform. The software offers a variety of streaming options, allowing you to customize the resolution, bitrate, and other settings to optimize your stream for different network conditions and audience sizes. Furthermore, the software provides real-time monitoring of your stream’s health, including bandwidth usage and connection status.
Setting Up a Live Stream in ProPresenter 7
Before initiating a live stream, ensure you have a ProPresenter 7 license and a streaming account with your preferred platform (YouTube Live, Facebook Live, Vimeo Live, etc.). You’ll also need a stable internet connection with sufficient upload bandwidth. The recommended upload speed will depend on your chosen resolution and bitrate, but a minimum of 5 Mbps is generally advised for 720p streaming.
- Open ProPresenter 7 and Access Streaming Settings: Navigate to the “Output” tab within ProPresenter 7’s interface. You’ll find the streaming settings within this section.
- Choose Your Streaming Platform: Select your preferred streaming platform from the available options. ProPresenter 7 will usually provide a drop-down menu for this.
- Enter Streaming Credentials: You’ll need to input your stream key and URL, which are unique identifiers provided by your streaming platform. These credentials authorize ProPresenter 7 to send your presentation to your chosen platform’s servers. Make sure to double-check the accuracy of this information before proceeding. Incorrect credentials will prevent a successful stream.
- Configure Streaming Settings: Adjust the streaming settings according to your needs. Options usually include resolution (e.g., 720p, 1080p), bitrate (the amount of data transmitted per second), and audio settings. Higher resolution and bitrate will result in better quality but require more bandwidth. Experiment with different settings to find the optimal balance between quality and bandwidth usage for your internet connection.
- Start the Stream: Once you’ve configured the settings, click the “Start Stream” button in ProPresenter 7. The software will then begin encoding and transmitting your presentation to your chosen platform. Monitor the stream’s status to ensure a smooth broadcast. ProPresenter will typically provide real-time feedback on the connection and any potential issues.
- End the Stream: When you’re finished with your live stream, click the “Stop Stream” button in ProPresenter 7. This will gracefully end the broadcast and prevent any disruptions to your viewers.
Comparison of Streaming Capabilities
Compared to other presentation software like PowerPoint or Keynote, ProPresenter 7 offers superior streaming capabilities. PowerPoint and Keynote lack integrated streaming features, requiring the use of third-party applications and potentially more complex setups. This can lead to increased technical challenges and potential for stream instability. ProPresenter 7’s built-in streaming engine provides a more streamlined and reliable experience, simplifying the process for users of all technical skill levels.
Furthermore, ProPresenter’s robust features, such as advanced media handling and live switching, provide a professional broadcast experience unmatched by simpler presentation software. The ability to seamlessly integrate multiple video sources, graphics, and audio enhances the overall production value of the live stream, creating a more engaging and professional experience for viewers.
Troubleshooting Common ProPresenter 7 Issues
ProPresenter 7, while a powerful tool, can sometimes throw curveballs. Knowing how to troubleshoot common issues can save you precious time and prevent those panicked moments before a live event. This section covers some frequently encountered problems and offers practical solutions to get you back on track.
Common ProPresenter 7 Problems and Solutions
Let’s dive into three common issues ProPresenter 7 users face, along with their fixes. These solutions are based on widespread user experiences and official documentation.
- Problem: Media Files Not Playing or Displaying Correctly. This can stem from various sources: incorrect file formats, corrupted files, or problems with the media path.
Solution: First, verify that ProPresenter 7 supports the file format. Commonly supported formats include MP4, MOV, and JPG. If the format is correct, try a different media file to rule out file corruption. Double-check the file path within ProPresenter 7 to ensure it accurately points to the location of your media.
Also, make sure the file permissions allow ProPresenter to access the media.
- Problem: ProPresenter 7 Freezing or Crashing. This can be caused by insufficient system resources (RAM, processing power), outdated drivers, or conflicting software.
Solution: Close unnecessary applications to free up system resources. Ensure your graphics drivers are up-to-date. Check your computer’s system requirements against ProPresenter 7’s minimum specifications. If you suspect a software conflict, try temporarily disabling other applications running in the background.
A restart of your computer might also resolve temporary glitches.
- Problem: Unexpected Behavior with External Hardware (e.g., Video Output, Audio Interfaces). This often arises from driver conflicts, incorrect settings within ProPresenter 7, or faulty hardware.
Solution: Update all drivers for your external hardware. Carefully review the output and audio settings within ProPresenter 7, ensuring they match your hardware configuration. Try testing the hardware with another application to isolate whether the problem lies with the hardware itself or the ProPresenter 7 configuration.
If possible, test with different cables to rule out connection issues.
Resolving Performance Issues in ProPresenter 7
Performance problems, such as lag or slowdowns, can significantly impact your workflow. Addressing these issues requires a systematic approach. Here’s a structured troubleshooting process:
- Check System Resources: Monitor CPU usage, RAM usage, and disk I/O during ProPresenter 7 operation using your operating system’s monitoring tools. High usage in any of these areas indicates a resource bottleneck.
- Close Unnecessary Applications: Close any applications you aren’t actively using to free up system resources for ProPresenter 7.
- Optimize Media Files: Large or high-resolution media files can strain system resources. Consider compressing your media files without significant quality loss to improve performance. Lowering the resolution of videos can significantly reduce the load.
- Update Drivers: Ensure that all your drivers, especially graphics drivers, are up-to-date. Outdated drivers can cause performance issues and compatibility problems.
- Reduce ProPresenter 7 Load: Decrease the number of layers, transitions, and effects in your presentations to reduce the processing burden on your system.
- Restart ProPresenter 7 and Your Computer: A simple restart can often resolve temporary glitches and performance issues.
Preventing Common Errors in ProPresenter 7
Proactive measures are crucial in avoiding common errors. By implementing these strategies, you can significantly reduce the likelihood of encountering problems.
Regularly backing up your presentation files is paramount. This safeguard protects your work from data loss due to crashes or accidental deletions. Consider using a cloud-based backup solution for redundancy. Additionally, regularly updating ProPresenter 7 to the latest version ensures access to bug fixes and performance improvements. This reduces the risk of encountering known issues.
Finally, thoroughly testing your presentations before a live event is crucial. This allows you to identify and resolve any potential problems before they disrupt your broadcast.
ProPresenter 7 Templates and Presets
Okay, so you’ve mastered the basics of ProPresenter 7, and now you’re ready to level up your presentations. Templates and presets are your secret weapons for creating consistent, professional-looking content quickly and efficiently. Think of them as your presentation shortcuts – pre-designed layouts and settings that save you tons of time and effort. Let’s dive into how to harness their power.Creating and using custom templates in ProPresenter 7 is surprisingly straightforward.
Essentially, you build a slide exactly how you want it—with your specific text styles, media placeholders, and transitions—and then save it as a template. This template can then be reused endlessly, providing a consistent look and feel across all your presentations. You can even create multiple templates for different presentation styles or events.
Creating Custom Templates
To create a custom template, design a slide in ProPresenter 7 with all the elements you want included. This might include text boxes with specific fonts and sizes, image placeholders, video placeholders, and even animated transitions. Once your slide is perfect, go to the “File” menu, select “Save As,” and choose “ProPresenter Template” as the file type. Give your template a descriptive name, like “Worship Service Template” or “Corporate Presentation Template,” and save it to a location you’ll easily remember.
Now, whenever you need a new slide with that same layout, simply select your saved template and ProPresenter will instantly create a new slide based on your design.
Types of ProPresenter Templates
The beauty of templates lies in their versatility. You can tailor them to virtually any presentation style. For example, a church might use a template with space for lyrics, a sermon title, and a background image. A corporate presentation might utilize a template incorporating charts, graphs, and speaker notes. A school might employ a template featuring colorful visuals, student quotes, and school logos.
The possibilities are truly endless. You can even create templates for specific segments within a larger presentation, such as an opening sequence or a closing segment.
Benefits of Using Pre-designed Templates and Presets
Using pre-designed templates and presets offers several key advantages. First and foremost, it dramatically reduces production time. Instead of starting from scratch each time, you can instantly create slides that match your branding and style. Secondly, it ensures consistency across your presentations. Every slide will maintain the same font styles, color schemes, and overall design, creating a polished and professional look.
Thirdly, it simplifies the workflow, allowing you to focus on the content rather than the design. Finally, presets can streamline your workflow even further, allowing you to quickly apply specific settings, such as transitions or audio effects, with a single click.
ProPresenter 7 Integration with Other Software

ProPresenter 7’s strength isn’t just its standalone capabilities; it shines when integrated into a larger production workflow. Its robust API and various input/output options allow seamless communication with other software and hardware, creating a truly unified and powerful production environment. This integration significantly enhances efficiency and opens up creative possibilities beyond what ProPresenter can achieve on its own.ProPresenter 7 can be a central hub in a multi-system production setup, communicating with lighting consoles, audio mixers, and other presentation software.
This allows for synchronized events, automated workflows, and a more streamlined experience for operators. Imagine a single trigger activating a lighting cue, a sound effect, and a transition in ProPresenter – all happening simultaneously and flawlessly. This level of control and automation is key to delivering polished, professional presentations.
Integration with Lighting Control Systems
ProPresenter 7 can integrate with various lighting control systems via OSC (Open Sound Control) or other protocols. This allows for automated lighting changes triggered by events within ProPresenter. For instance, when a specific slide appears, the lighting console can be programmed to shift to a pre-set scene. This could be a simple change in intensity or a more complex shift involving multiple fixtures and colors, perfectly timed with the presentation’s flow.
Software like Resolume Arena, often used for VJ work, also leverages OSC, allowing for synchronized visuals and lighting effects, further enhancing the immersive experience.
Integration with Audio Control Systems, Propresenter 7
Similarly, ProPresenter 7 can interact with audio mixers through OSC or MIDI. This allows for precise control over audio levels and effects. Imagine triggering a specific audio track to play when a particular slide appears, or automatically adjusting the overall volume based on the content displayed. This tight integration ensures that audio and visuals work in perfect harmony, creating a more engaging and immersive experience.
For example, a church service might use this integration to automate the playback of hymns, or a concert could use it to synchronize music and stage lighting.
Examples of Successful Integrations
A common and highly effective integration involves using ProPresenter 7 with a lighting board such as a ChamSys MagicQ. By sending OSC commands from ProPresenter 7 to the MagicQ console, the lighting designer can create dynamic and responsive lighting scenes synchronized to the presentation’s pacing and content. Another successful integration example is the use of ProPresenter 7 with a broadcast automation system like vMix.
This allows for a seamless switch between live camera feeds and ProPresenter slides, creating a professional broadcast-quality production. Finally, the use of ProPresenter 7 with a networked audio mixer, such as a Yamaha CL series console, allows for automated audio cues and level changes, complementing the visual presentation perfectly. These are just a few examples showcasing the powerful potential of ProPresenter 7’s integration capabilities.
ProPresenter 7 Training Resources

So you’ve got ProPresenter 7 up and running, but you’re feeling a little lost in the shuffle? Don’t worry, tons of resources are out there to help you master this powerful presentation software, from newbie tutorials to advanced techniques. We’ll break down the best options, categorized by skill level, so you can find exactly what you need to level up your presentations.ProPresenter’s training resources are spread across various platforms and formats, offering flexibility for different learning styles.
Whether you prefer video tutorials, written manuals, or structured courses, there’s something to suit your needs and learning pace. Choosing the right resource depends on your current skill level and specific learning goals.
Beginner Resources
For those just starting out with ProPresenter 7, a gentle introduction is key. Beginner resources focus on the fundamental aspects of the software, helping users grasp the core concepts and workflow. This allows users to quickly become comfortable with the interface and basic functionalities.
- ProPresenter 7 Quick Start Guide (PDF): This downloadable guide provides a concise overview of the software’s essential features and workflow. It typically covers basic setup, importing media, creating simple presentations, and using basic playback controls. Think of it as your first day on the job – it gets you started.
- Official ProPresenter YouTube Channel Tutorials: The official channel offers a series of short, focused videos demonstrating basic functions. These videos often cover specific tasks, like importing media or creating transitions, making them ideal for targeted learning. Think bite-sized learning for quick wins.
- Online Forums and Community Support: Engaging with the ProPresenter community through forums can provide answers to specific questions and offer insights from experienced users. This peer-to-peer learning environment can be invaluable for troubleshooting common issues and finding creative solutions. Think of it as your support network.
Intermediate Resources
Once you’ve grasped the basics, intermediate resources delve into more advanced features and techniques. This level focuses on refining your skills and exploring more complex workflows, leading to more polished and professional presentations.
- ProPresenter 7 User Manual (PDF/Online): A more comprehensive guide than the quick start guide, the full user manual provides detailed explanations of all features and functions. It’s your go-to resource for in-depth information on specific tools and techniques. Think of it as your comprehensive textbook.
- Advanced ProPresenter 7 Tutorials (YouTube/Online Courses): These resources cover topics like advanced media handling, complex transitions, and integrating with other software. They might demonstrate techniques for creating dynamic and engaging presentations using layers, masks, and keyframes. Think of it as your advanced training.
- Third-Party Training Videos and Blogs: Many independent creators offer tutorials and blog posts focusing on specific aspects of ProPresenter. These resources often offer unique perspectives and creative workflows not covered in official documentation. Think of it as your expert advice from outside the company.
Advanced Resources
For power users, advanced resources explore the most sophisticated features and customization options. This level focuses on maximizing the software’s potential and creating highly customized and optimized workflows for complex presentations.
- ProPresenter 7 API Documentation: For developers or highly technical users, the API documentation allows for custom scripting and integration with other systems. This opens up possibilities for automating tasks and creating highly customized solutions. Think of it as your ultimate power-user toolkit.
- Advanced Workshops and Webinars: These often involve hands-on training with experienced instructors, providing opportunities for in-depth learning and personalized feedback. They can cover advanced topics like live streaming setups, complex template creation, and efficient workflow optimization. Think of it as your specialized masterclass.
- Custom Template Development and Customization: Creating custom templates allows for efficient workflow and consistent branding. Learning to effectively design and utilize custom templates can significantly streamline the presentation creation process. Think of it as your secret weapon for efficiency.
Last Recap
Mastering ProPresenter 7 opens a world of creative possibilities. From streamlined workflows to stunning visual effects, this software empowers you to create unforgettable presentations and live streams. By understanding its system requirements, navigating its intuitive interface, and leveraging its advanced features, you can confidently create compelling content that captivates your audience. So, dive in, experiment, and unleash your creative potential with ProPresenter 7!
Clarifying Questions
Is ProPresenter 7 compatible with Macs running older macOS versions?
While ProPresenter 7 requires a relatively modern macOS version, check the official website for the most up-to-date compatibility list. Older systems might require significant upgrades to meet the minimum specifications.
Can I use ProPresenter 7 with touchscreens?
Yes, ProPresenter 7 supports touchscreen interaction, enhancing workflow efficiency, especially for tasks involving media selection and arrangement.
What are the best practices for optimizing ProPresenter 7 performance?
Use high-quality but appropriately sized media, close unnecessary applications, and ensure your hardware meets or exceeds the recommended specifications. Regularly clearing the cache can also help maintain optimal performance.
How much does ProPresenter 7 cost?
Pricing varies; check the Renewed Vision website for current licensing options and pricing details. They offer different tiers to suit various needs and budgets.
Does ProPresenter 7 offer cloud storage integration?
No direct cloud storage integration is built-in. However, you can use cloud services to store and manage your media assets separately, then import them into ProPresenter 7 as needed.
